|
The Metalworking Shop Mod I |
|
|
|
I’ve spent some time modifying the shop and adding
to the storage as I have using the tools. It is starting to make a
difference. I’ve got some modifications and ideas for workbenches that have
proven to be convenient. I've been busy, and made a
few other modifications, so the pictures have been changed, along with some
items.... |
 |
This is an old
Sears workbench. It had a 1 inch MDF top, three drawers down the side, and
is made of relatively cheap steel. Still, it wasn’t used much until I
decided to put the lathe on it. That worked reasonably well, but I found
that the storage space was not a bit organized. If I had spent all that
money for lathe accessories (and I did, too!), then it was time to get them
organized. I found that I wanted to have the cutting tools in one location,
the measuring tools in quite another, and the lathe accessories in another.
I’d also like to do a bit more about the lighting, which is good enough for
overall (a shop light fixture overhead), but really lacks task lighting.
I've added task lighting, which can be seen in the next picture.
I also need a big trashcan for swarf…..
|
 |
I said on the
metalworking list that I really liked the DeWalt lights that were used for
their scroll saws. I still do. I found the opportunity to get
two more, and removed the magnetic light from the lathe. In its
place, I put the DeWalt lamp. This is highly recommended as a
modification. When you get them at the local service center, they're
inexpensive and in perfect condition. The quick change tool post is on
the lathe, but without a tool. |
 |
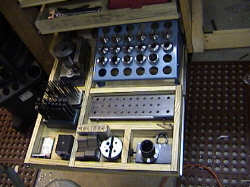
The first thing I
did was to clean out the drawers, and put a piece of melamine in the top
one. A bit of work with some scrap plywood and some dowels give me a good
place to store the lathe accessories. The part in front is still a bit
disorganized, it needs a few plastic bins for things. Each chuck has its own
space, and the jaws and spare screws, as well as keys, are above. If I get
more live or dead centers, I’ll put them in back. What’s in back are screw
gauges and a few things specific to the lathe.
|
|
The unused post in the front is for the 80 tooth gear, and
there’s a blank post in the back for the 20 tooth gear when it is removed.
The chuck has its own pocket as well. This isn't the current layout,
quite, but the stuff in the lower right hand corner has changed. I've
got the tool holders for the lathe in there, as well as the lathe tools.
Bullet holders for reloaders (available at your local HF store make a dandy
holder for lathe tools. Try one and see.... |
 |
At this point, I’ve
taken the top and laid another 3/4 inch piece of melamine on top of it.
Melamine is easy to clean, and moderately inexpensive in 4 by 8 foot sheets.
I also decided that I wanted a backboard, so a little work with some 2 x 4
lumber to make some shims and a support for the backboard did just fine. The
backboard itself is particle board, just the ordinary kind.
One thing I added was a pine strip along the front, it protects the
melamine, and also is easier on the hands.
This is an earlier picture, but you can get the idea. |
|
The workbench immediately to the right of the lathe is for
the mill, and is a larger, home built bench. It has a top of 2 x 6 lumber
and stands on 4 x 4 lumber. More about that in a bit. You can see the clamp
set and the two sets of T-handle allen wrenches on the wall. They are
mounted on a piece of wood to space them out from the back. Apparently, the
Chinese who made this thought that I would mount them 90 degrees to the
current position. I had other ideas. The lamp hanging down is a Black &
Decker snake lamp that is too weak to hold it’s head up, and spends most of
its time hanging head down from a convenient rafter. It lights up the lathe
and keeps the rodent population down.
I'm not sure where it's going to have a new home, but I suspect that it
will have one.
|
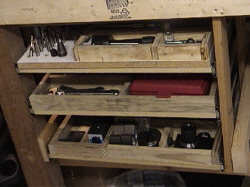 |
I've
added as many drawers as that stack will take, so the last round of
organizing has added that third drawer. Amazing what you cam make from
particle board and some old wood, espceially when you run the old wood
through a surface planer. Closeups of the drawers
come next. These are on heavy duty slides, so no sense in not having
some quality here.
I'll eventually put some drawer fronts on the drawer
bottoms, so everything will look a bit nicer, but that's later. |
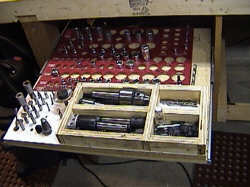 |
Here's the
first drawer. I added a few things
to organize tools. The back part in red is a socket organizer, and the part
to the left is melamine, drilled to organize the collets and mills. The
wooden cage has the wrenches, the drill chuck, and whatever else will fit in
the box. There’s a layer of non-skid honeycomb cushion in the two boxes.
That cushions the tools and quiets the thing down. No clinking. |
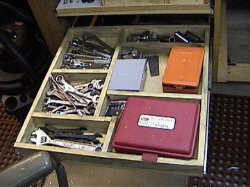 |
The next drawer
down holds the parallel set, some drills, and lots of odd sockets and
wrenches. This seemed a good location for the miscellaneous ones,
although this might get thinned out a bit depending on what gets done. |
 |
The third drawer
holds the heavy stuff. There's a set of 5C collets, a bench block, a
sharpening jig, and the collet holding fixtures, as well as the milling
fixtures. Below the bench, and on the floor, is the floor mat that I
got. I intend to make my life easier by having some nice cushioning on
my feet. |
 |
This is a shot of
the main workbench with the mill. You can see the melamine top. It cleans
nicely. The two drawers are at the left, and barely seen is a quiet shop-vac.
The area to the left gets used for lathe tools, and the area to the right
has mill stuff.
I’ve got to make this picture larger than the others, because it shows
the shop in it’s normal, clean state. Of course it is this clean. All the
time. Even when I’m working on a project. Always. Please don’t look on the
bench to the right. (out of photo)
I should mention that I've now cleaned up that bench, and it deserves a
look.
|
 |
The second bench is
now cleaned up, and is still in a bit of flux. Right now the grinders
and such are on the right hand side of the bench, the drill press and vise
are on the left. |
 |
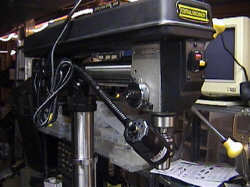
The drill press is
one of the inexpensive varieties, and I had originally bought it for use in
grinding tools. I think I may still keep it there, although time will
tell how much it gets used. It is a bit underpowered, but what should
I expect when it's an on sale item? Found a use for the magnetic base
lamp, because that drill press badly needs a task light. |
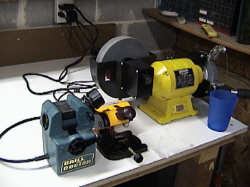 |
I've got the
grinders on the right side, kinda far away from everything. I've got a
low speed tool grinder, a drill doctor, and a and a small cutoff saw.
I'm not sure how good that cutoff saw is really going to be. It seems
to be woefully underpowered. |
|
The idea of a melamine top is quite nice. So far, it is hard,
relatively durable, moderately inexpensive, and easy to clean. A further
advantage is that small dark parts are very easy to find on all that clean
surface. It won’t be damaged by water or oil. There’s enough space on either
side of the mill to be able to lay out stuff, tools, and even… plans. I
think some more task lighting would be nice, though. Not shown are an arbor
press, a power hacksaw, and a drill sharpener.
|
|
 |
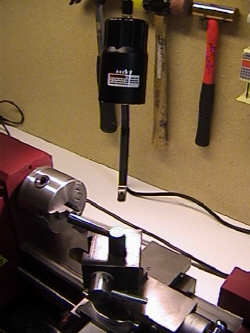
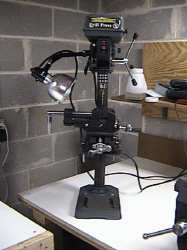
Another addition is
a radial drill press. Now I can get to the middle of the things I
couldn't drill with the mill, or the other drill press (I have one in the
wood shop). I'm happy enough to leave the one in the wood shop in that
shop, it simplifies life. The lamp was not part of the original
equipment, but was an add-on. It provides some very nice task lighting
for drilling, although I will say that the mill is a lot more sturdy than
the drill press. |
 |
I was looking at
the local HF store a bit today, trying to find a shear and metal bending
tool. I didn’t find much that I wanted, but I did see a small magnetic
light. I decided to take a chance on it, and brought it home. It looks nice
on the lathe.
The small hammer has a copper head for banging on delicates….
I don't like this light too much, the switch is cheap and breaks easily.
That's what I had before on the lathe. It's the last surviving one.
I have a switch to replace.
|
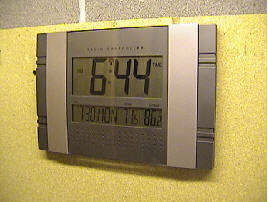 |
I decided to get a
nice shop clock. Now this is in the basement, and I can’t see out. Now I
could poke a spare TV camera out a window, and that’s not a bad idea. But
it’s nice and cool in the basement, about 71 degrees. The wireless monitor
shows the outside is a balmy 86 degrees. This is an atomic clock (big
applause), and is much less expensive than any other that I’ve been able to
find that has such large digits. I don’t have to worry about anything but
batteries, either. It even shows me the day of the week in case I misplace a
day or two…. |
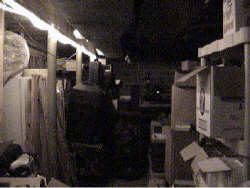 |
I’ve never changed
the lighting in the basement, and I’ve always needed a way to light the way
into the shop, which is in a far back corner. I found some rope lights,
which I added a switched outlet to run. The switch is by the door, so I just
turn them on and wend my way back to the workbench, where I can turn on the
lights. The rope lights were surprisingly inexpensive at one of the local
stores, far less than what the big name megalumber stores would charge.
Kinda neat, I think. I've also wired in the shop
lights to the same switch panel, so I can turn on and off the shop lights
from the door. Not too bad, although the rope lights are still useful.
I also have the shop equipment and the lighting on
separate breakers, although that's never been a problem, but it has been
quite convenient when wiring up the system.
|
|
I’ve got room in here to make a few more comments. Setting up
the shop has not been inexpensive, you can add up the stuff yourself.
However, I’ve been lucky enough to get sales on the four major pieces of
equipment. I didn’t have to make the workbenches, although I ended up
modifying the existing designs by a bit. I do really recommend the melamine
tops, and the added front board makes the workbench look a bit more elegant.
Of course, it’s the same old thing underneath all this. I think I’ll add a
bit of wood finishing to the front, and that should help protect the wood
from grease. General comments: Good wiring is a must, the machines take a
bit of power. Good lighting is also of paramount importance. Shop lights are
inexpensive, and you can get task lighting for the machines without much
difficulty. If you get a shop vacuum, get the most quiet one you can. Get a
good chair so you can sit and think about things, when needed. A small DVM
is also a good idea, they’re cheap.
|


